The first rule for making Montessori color tablets at home is the one nobody mentions: if the tablets are not exactly the same size, the same weight, and the same texture, the material is broken before you even start. Not slightly compromised. Actually broken, in the Montessori sense.
That is the whole thing with DIY color tablets. The making is not the hard part. Getting the isolation of quality right: so that the only thing that varies from one tablet to the next is the color itself, and that is what separates a set of pretty painted tiles from a genuine Montessori learning material. Once you understand that, choosing your method becomes straightforward.
Quick Reference
- Best all-round method: Wooden tiles (balsa or MDF) with acrylic paint, matte Mod Podge seal
- Best free method: Hardware store paint chips, cut uniformly, laminated
- Best for Box 3: Painted wood only: paint chips rarely produce 7 clearly distinct shades
- What to avoid: Glossy finish (distorts color comparison), unequal sizes, touching the colored surface during use
- Time to make: Box 1 and 2 in 1-2 hours. Box 3 in a full afternoon (63 tablets, 9 colors, 7 shades each)
- Total cost: Free (paint chips) to around 25-35€ (painted wood, all 3 boxes)
The Rule That Determines Everything: Isolation of Quality
Montessori sensorial materials are built around a single design principle: every attribute of a material except the one being taught must be held constant. In the color tablets, the one quality under study is color. So every other attribute: size, shape, weight, texture, surface finish: all must be identical across every tablet in a set.
This matters more for DIY than for commercial sets, because when you make the tablets yourself, every inconsistency is a variable you have introduced. A child who picks up one tablet that is slightly heavier than another, or one that has a shinier surface, is getting mixed signals. They may be comparing weight or texture rather than color, and they will not know it, and neither will you.
The Practical Checklist Before You Start: Before choosing a method, confirm you can achieve all of the following. Every tablet the same width and height (within 1mm). Every tablet the same thickness. Every tablet the same surface finish (all matte, no exceptions). Every tablet with a white or neutral border the child can hold without touching the color. If your chosen method cannot guarantee these four things, switch methods.
The 4 Methods Compared
Four distinct approaches exist for DIY color tablets. Each has a different profile of cost, effort, durability, and the most important variable: suitability for Box 3. Here is how they compare before going into the detail of each.
Method 1: Paint Chips (Free, Best for Box 1 and 2)
Hardware store paint sample cards are flat, already colored, and free. For Box 1 and 2, they are genuinely the best starting point: the colors are professionally produced, consistent between any two cards of the same shade, and easy to cut to uniform size. Pick up two cards of each color you need, cut them to identical rectangles, laminate with a matte laminator pouch, and cut again. Leave a 6-8mm white margin on each short edge to serve as the handling border.
The limitation is Box 3. Hardware store paint strips typically offer 3-5 shades per color, but genuine Box 3 requires 7 clearly distinct shades that grade smoothly from darkest to lightest with no ambiguous steps between adjacent tiles. Paint strip ranges often jump too abruptly between shades in the dark range and too subtly in the light range. You can build a workable Box 3 with paint chips, but you will likely need to visit multiple stores and compare strips across brands to find 7 shades that form a convincing gradient for each of the 9 colors.
What works
Professional, consistent color quality
Fast to make (1-2 hours)
Matte finish achievable with matte laminator pouches
Watch out for
Strips from different ranges vary in saturation: compare before cutting
Insufficient shades for a complete Box 3 gradient
Step by step
- Collect paint strip samples from a hardware store. Take at least 2 of each color.
- Decide on a uniform size: 5 x 3 cm works well. Mark identically with a ruler and pencil on the back of each strip.
- Cut with sharp scissors or a rotary cutter on a cutting mat. A rotary cutter gives cleaner, more uniform edges.
- Laminate with matte laminator pouches. Glossy laminate changes the way light reflects and makes shade comparison harder.
- Cut again after laminating, leaving 5mm of laminate around the color and at least 6mm of white margin at each short end.
- Round the corners with a corner rounder punch.
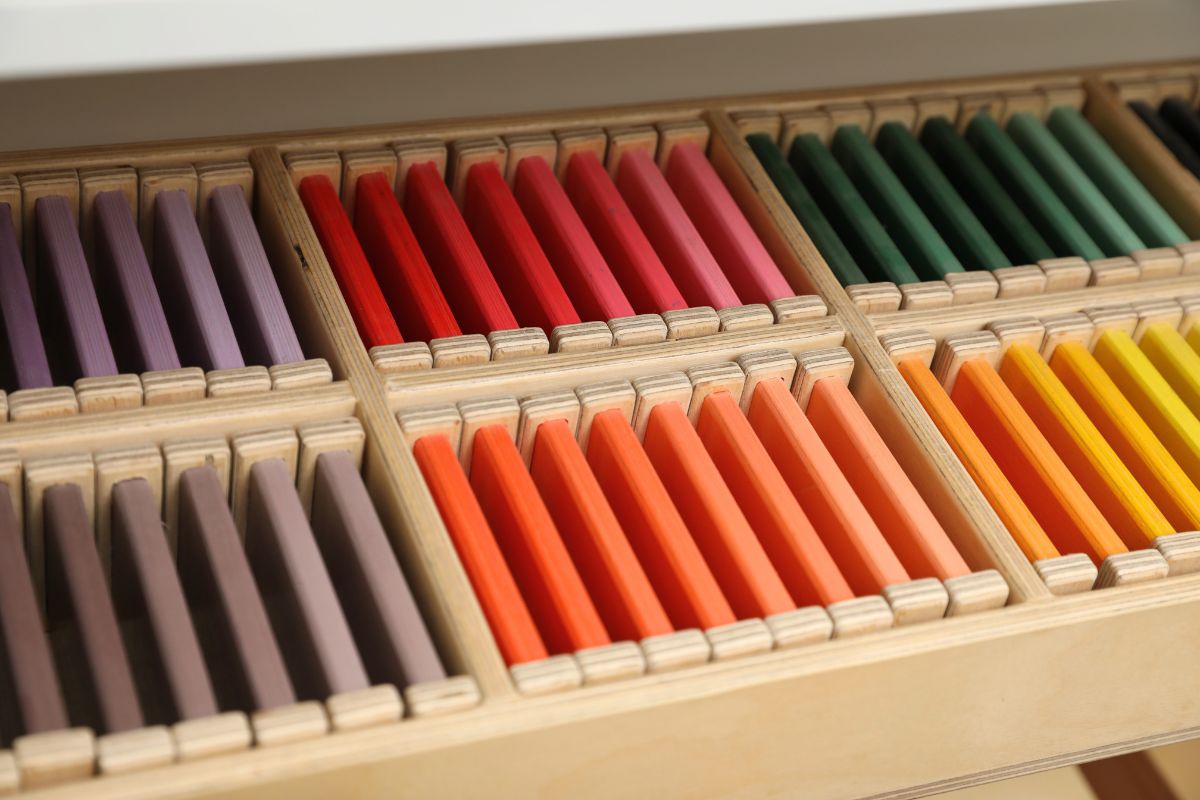
Method 2: Painted Wood Tiles (Best Result, Best for Box 3)
This is the method closest to the commercial material and the only one that handles Box 3 properly. Thin balsa wood or MDF strips, cut into uniform rectangles, sanded, primed, and painted: one color per tile, white edges, sealed with matte Mod Podge. It takes more time than paint chips, but the result is a set that is genuinely worth keeping for years.
The key to Box 3 is controlling your gradient. Start with the pure color straight from the tube for the darkest tile. For each successive tile, add white in increasing proportions: a tiny drop for the second shade, slightly more for the third, and so on. Mix your paint in small quantities and test on a scrap of cardboard before painting the actual tile, because the color will shift as it dries. A shade that looks right wet often dries lighter. Let each test piece dry fully before deciding on the next step in the gradient.
What works
Long-lasting and durable
Feels closest to the commercial material
Easier to achieve a truly uniform matte finish
Watch out for
Gradient shift on drying: test on scrap, always dry before judging
Time-intensive (Box 3 is a full afternoon project)
Step by step
- Buy balsa wood sheets (3mm thick, 7.5cm wide) from a craft store, or pre-cut MDF tiles. Cut into 5 x 3 cm rectangles using a rotary cutter and ruler. Cut all 63 tiles before starting to paint.
- Sand lightly with 220-grit sandpaper. This is tedious for 63 tiles but essential for uniform surface feel.
- Apply one thin coat of white primer to all tiles. Let dry completely.
- Use 2cm masking tape to protect the short edges (the white handling border). Press the tape edge firmly to prevent paint seepage.
- Mix your gradient colors for each of the 9 color families. For each family: start with pure paint (darkest), then progressively add white in increasing amounts for shades 2 through 7. Test each shade on a spare tile and let it dry before painting the final tile.
- Apply 2 thin coats of each shade, letting dry fully between coats.
- Remove masking tape. Touch up white edges with a fine brush if needed.
- Seal all tiles with matte Mod Podge (not glossy). Two thin coats, fully dry between coats.
Method 3: Embroidery Bobbins + Origami Paper (Box 1 Only)
Plastic embroidery bobbins wrapped with colored paper have been popular in Montessori DIY communities since the early days of home practice. They are cheap, quick to make, and visually appealing. For Box 1 (three pairs of primary colors) and they work well as a starter. The child can hold the bobbin by its white plastic ends, the colored paper is clearly visible, and the pairs are easy to match.
The problem starts at Box 2, and by Box 3, this method cannot work at all. The bobbins are all the same color paper, just different papers wrapped on them: the surface texture will vary slightly between sheets, the wrapping will be slightly inconsistent, and there is no way to achieve the smooth 7-shade gradient that Box 3 demands. Keep bobbins for Box 1 only, or as an introductory material for a 2-year-old before you make a proper set.
Good for
Very fast and cheap
Not suitable for
Long-term use (fragile, paper unravels)
Accurate shade grading
Method 4: Printed and Laminated Cards (Free, Quick Starter)
Free printable color tablet templates are available from Montessori Album and a few other sites. You print them, laminate, and cut. The white borders are already built into the design. For Box 1 and 2, this is the fastest zero-cost solution and works reasonably well if your printer produces accurate, saturated color output. For Box 3, quality depends entirely on your printer: a cheap inkjet will produce a muddy gradient in the mid-tones, while a good-quality laser printer will produce a usable result.
The main limitation is longevity. Laminated paper cards feel lighter and flimsier than the commercial material, and the corners will eventually peel. Use this method to begin quickly before you decide whether to invest in wooden tiles for the long term.
Best use case
Testing whether your child is ready before investing time
Good printer required for Box 3
Box 3 in Detail: Getting the Gradient Right
Box 3 is the hardest DIY project in the sensorial area, and the most commonly done badly. Sixty-three tiles across nine color families, each family grading through seven distinct shades. The child needs to be able to see every step in the gradient as clearly distinct from its neighbor. If two adjacent shades are too similar, the material provides no error control: the child cannot tell whether their ordering is right or wrong.
The 9 Color Families and Starting Points
For painted wood tiles, use artist’s quality acrylic (not cheap craft paint) for all nine families. Start with the pure tube color for Shade 1 (darkest), then mix increasing amounts of titanium white for Shades 2-7. The exact ratios depend on the pigment strength of your paint, so test each shade on a dry scrap tile before committing.
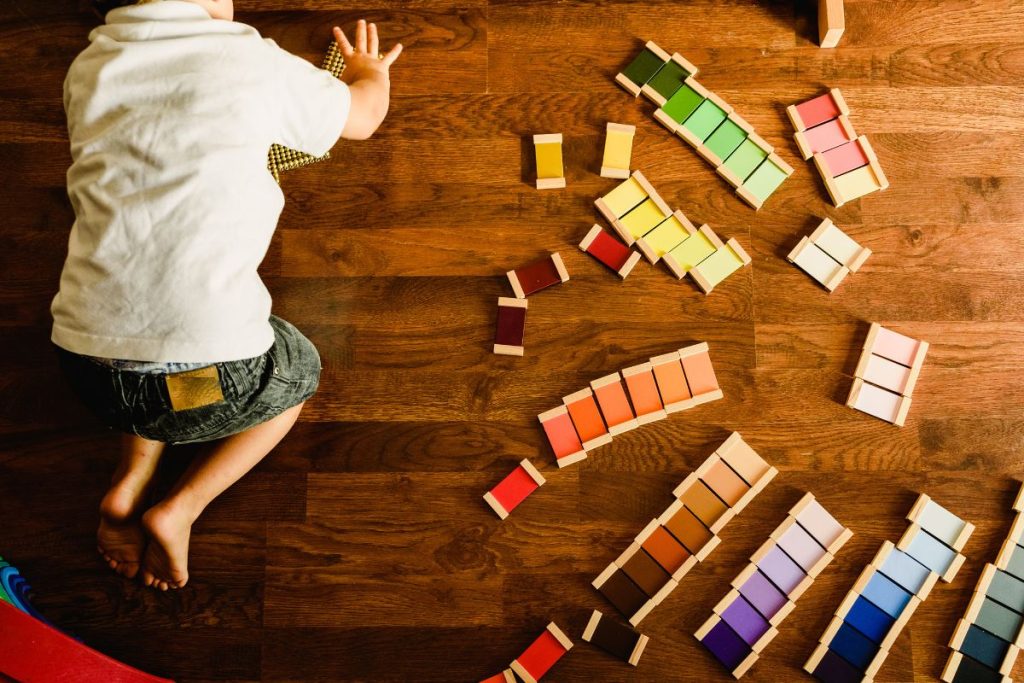
The test before you commit: Before sealing any set of 7 tiles, lay them in gradient order on a white surface and photograph them in natural daylight. Look at the photo on your phone screen. If any two adjacent tiles look nearly identical in the photo, your gradient has an ambiguous step that needs adjusting. Fix it before sealing. A child working with your tablets will encounter this ambiguity every single session: far better to catch it now.
The Mistakes That Ruin a DIY Set
Most DIY color tablet failures share one of five root causes. All of them are avoidable.
The 5 common failures
- Glossy finish: Shiny laminate or varnish reflects light differently at different angles. A child tilting a tile slightly sees a different apparent color. Always matte.
- Unequal sizes: Even 2mm variation between tiles breaks isolation of quality. Use a rotary cutter and cutting mat, not scissors.
- Touching the color: No white handling border means the child touches the colored surface. Fingerprint oils accumulate and dull the comparison within a week.
- Box 3 with paint chips: Paint strip gradients were not designed for Montessori grading. The 7 steps are rarely even and distinct.
- Cheap paint for Box 3: Low-pigment craft paint produces muddy mid-tones and uneven drying. Use artist’s acrylic.
The fixes
- Always specify matte finish, whether laminator pouch or Mod Podge.
- Cut all tiles from the same sheet in one session with a rotary cutter. Measure once, mark lightly in pencil, cut all at once.
- Design at least 6mm of white on each short edge. For painted wood, use masking tape. For chips, leave white margin before cutting.
- For Box 3, use painted wood or a good-quality printable from a color-calibrated printer.
- Use artist’s quality acrylic (Liquitex, Golden, or equivalent) for Box 3. Craft acrylic is fine for Box 1 and 2.
Questions Parents Ask Most Often
Do I need to make all three boxes, or can I start with just one?+
Start with Box 1 or use the primary colors from Box 2 as a Box 1 substitute: that is what most experienced Montessori parents do. Box 2 is the most versatile single purchase or DIY project, covering the full color curriculum for matching. Box 3 can wait until the child is 3.5 to 4 and working confidently with Box 2. Making all 63 Box 3 tiles before your child is ready is a lot of work for a material that will sit on the shelf for a year.
Can I use the hardware store paint strips directly, without laminating?+
Technically yes, but they will not last more than a few sessions. Paper strips absorb finger oils, curl at the edges, and the color surface dents and creases. Laminating adds durability, protects the color surface, and gives each tile a uniform texture. The five minutes it takes to laminate is worth it. Use a matte pouch, not glossy.
How do I know if my DIY set is good enough to be used as a real Montessori material?+
Three tests. First: close your eyes, pick up two random tiles from the same box, and feel them. They should feel identical in size, weight, and texture. Second: lay all tiles for one color family in gradient order and photograph them in natural daylight. Each shade should be visually distinct from its neighbors in the photo. Third: hold one tile at different angles in natural light. The apparent color should not shift. If it does, your finish is too glossy. Pass all three and you have a usable material.
Is it worth buying the commercial set instead of making them?+
For Box 1 and 2, a good DIY set is genuinely equivalent to commercial. For Box 3, the commercial sets have one significant advantage: the gradient has been calibrated professionally and you do not have to worry about ambiguous mid-tones. If you have the time and enjoy making materials, DIY painted wood produces an excellent Box 3. If you do not, buying Box 3 and making Box 1 and 2 yourself is a sensible middle path. The commercial Box 3 alone (without Box 1 and 2) costs around 30-50€ from most Montessori suppliers and is worth it if Box 3 DIY feels too daunting.
The Making Is Half the Understanding
When you sit down and mix seven shades of red from dark to light, testing each one on a scrap tile and waiting for it to dry before judging the next step, you start to understand the material in a way that unboxing a commercial set does not give you. The child who uses tablets you made has a parent who understands exactly what the material is doing and why.
That understanding makes all the difference in how you present it, observe it, and know when to introduce the next box. The full guide to how color tablets are presented and used covers each box’s presentation, what to look for while the child works, and the extensions that follow once pairing and grading are mastered.