Looking to ditch the high-priced learning towers and get your little explorer involved in daily activities? Here’s your secret weapon: Ikea! Their affordable furniture is perfect for creating a DIY Montessori learning tower – a sturdy structure that lets your child safely explore the world alongside you.
But wait, there’s more! This isn’t just about saving money. Montessori focuses on fostering independence through exploration. The learning tower empowers your child to reach new heights (literally!) and participate in household tasks – a recipe for building confidence and strengthening your bond.
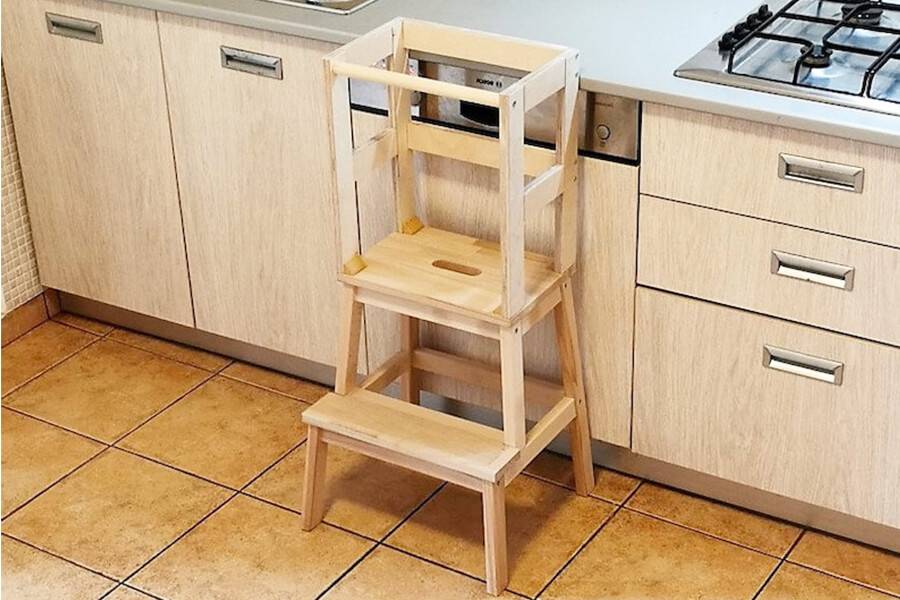
The Montessori Learning Tower: Meet the Mini-Me Platform
A Montessori learning tower is a mini-me platform that lets your little explorer safely reach countertops and join the fun! Stairs, rails, and a sturdy build make it perfect for curious climbers to conquer new heights.
The Montessori learning tower can be used from 18 months of age, when a child begins to walk and shows interest in exploring their surroundings. They’ll gain confidence and independence as they safely climb and reach new heights. The observation tower can typically be used by children up to the age of 6 or 7, depending on their size and development.
Intrigued? Here’s the lowdown
- Montessori Magic: If you’re new to the Montessori method, it’s all about respecting your child’s natural desire to learn and explore independently. Ikea’s simple, functional furniture makes it easy to create a Montessori-inspired play space without breaking the bank.
- The Tower of Power: Imagine a magical step stool that lets your little one reach countertops and participate in daily activities safely. That’s the beauty of a learning tower – it’s the perfect platform for exploration and fostering independence.
- Ikea Hack Attack! Here’s the best part: creating a learning tower with Ikea furniture is surprisingly simple! With a few clever adjustments (we’ll show you how!), you can transform basic Ikea finds into a beautiful and functional Montessori tower.
How To Build Your IKEA Learning Tower in 5 Easy Steps!
Calling all DIY enthusiasts! Ready to ditch the expensive learning towers and create a safe space for your little explorer to join the fun? It’s easier (and cheaper!) than you think!
With just a few Ikea finds, you can transform them into a stimulating learning tower in 5 easy steps! Here’s the magic combo:
- BEKVÄM Step Stool: This sturdy step provides the base for your tower.
- ODDVAR Stool: This stool acts as the platform, giving your little explorer the perfect height to reach countertops.

Now that you know the secret ingredients, let’s get started building your very own Ikea learning tower!
Here’s the step-by-step guide to transform those basic Ikea finds into a safe and stimulating learning tower for your child.
What You’ll Need:
- 1x ODDVAR Stool
- 1x BEKVÄM Step Stool
- 4x 3cm Wood Screws
- 4x 2.5cm Wood Screws
- Drill with appropriate drill bit
- Electric screwdriver (or regular screwdriver)
- Paint (optional)
Step 1: Gather Your Treasures
Head to your local Ikea and pick up the star players: the sturdy BEKVÄM step stool and the versatile ODDVAR stool. These affordable finds are about to become a mini explorer’s dream come true!
Step 2: Build the Base (BEKVÄM Step Stool)
This is a breeze! Simply follow the included Ikea instructions to assemble the BEKVÄM step stool. It’ll be the foundation for your little one’s climbing adventures.
Step 3: Hack the Stool (ODDVAR Stool)
Here’s where the magic happens! For the ODDVAR stool, we’ll make a few tweaks:
- Flip the Script: Screw the seat of the stool to the underside of the legs. This transforms the seat into a platform for your little one to stand on.
- One Less Step: Leave out one of the two crossbars when assembling the stool. This creates a safe and easy climbing area for your child.
Step 4: The Grand Assembly!
Now for the big moment! Carefully position the modified ODDVAR stool (seat side down) on top of the BEKVÄM step stool. Center the stool and secure it with the 2.5cm screws from the bottom of the step stool. This ensures the base remains clear for your child’s feet.
Step 5: Time to Play!
Get creative! If you want to add a personal touch, paint your learning tower to match your playroom decor.
Congratulations! You’ve built a safe and sturdy learning tower for your little one to explore the world alongside you – all for a fraction of the cost!

IKEA Montessori Learning Tower Alternatives
No matter your budget or DIY skills, there’s a perfect learning tower option to encourage your little one’s exploration and independence!
Here are a few options:
- DIY Magic: Get creative and repurpose furniture you already own! A sturdy stool or chair combined with a platform (like a crate or small table) can be transformed into a safe and functional learning tower.
- Pre-made Convenience: Several stores offer observation tower kits containing all the pre-cut materials you need for quick and easy assembly.
- High-End Options: For those seeking a more luxurious learning tower, there are various manufacturers specializing in beautifully crafted and often adjustable towers.