

The first Munari mobile I tried to assemble looked perfect on the table and collapsed into a tilted knot the moment I lifted it. The template was not the problem. I had treated balancing as the final detail when it is actually the whole construction.
This version focuses on the part most DIY guides rush. You will get the free printable, exact dowel lengths, the safest practical material choices, the order in which to balance each section, and a clear setup for supervised awake time. No claims that a mobile will transform your baby, just a careful way to make the classic material work as intended.
Before You Start
- Best stage: The early newborn weeks, while high-contrast forms and slow movement still hold the baby’s attention.
- Use it here: Above a supervised movement mat or awake observation area, not as an object the baby can touch.
- Dowel lengths: 36 cm, 30 cm and 18 cm.
- Sphere size: Approximately 6 cm. Choose a lightweight clear acrylic ornament rather than glass for a home DIY version.
- The hardest step: Finding the balance point of each dowel before connecting the full mobile.
- Stop using it: As soon as the baby can reach, push up toward it, or no longer watches it with interest.
What the Munari Mobile Is, and What It Is Not
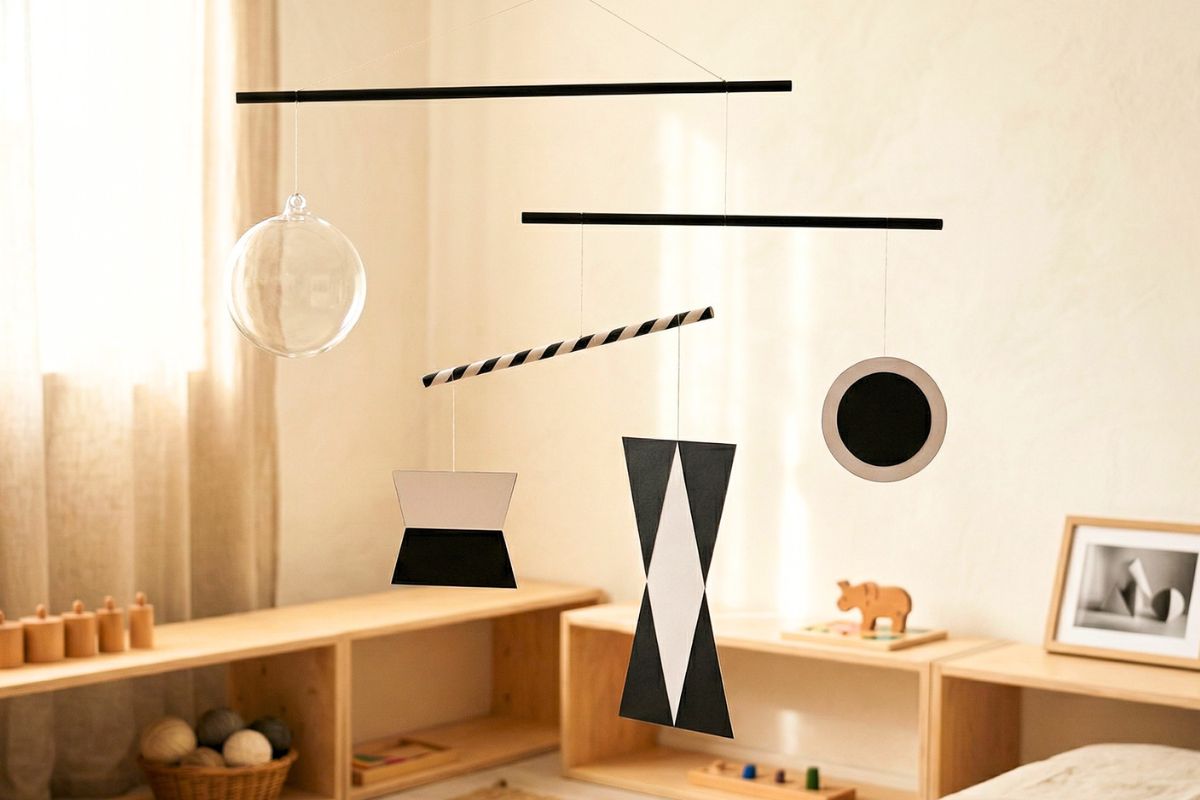
The Munari is commonly presented as the first visual mobile in a Montessori infant environment. It uses black, white and transparent elements arranged at different levels. Gentle air movement causes the forms to turn slowly, giving a newborn a clear visual target during calm awake time.
High contrast is relevant because newborn vision is still immature. Black and white create a strong visual boundary that is easier to detect than a pale, detailed nursery decoration. This does not mean the mobile teaches concentration or guarantees better development. It simply offers a developmentally visible object to observe.
Do not over-personalise it. Adding a name, multiple colours, bells, lights or heavy themed shapes turns a simple visual material into a different mobile. That may still be attractive, but it is no longer solving the same problem.
Download the Free Munari Mobile Template
The A4 printable includes the black and white pieces used in this tutorial. Print at 100% scale. Do not choose “fit to page,” since resizing changes the relative proportions.

Free A4 Printable
DIY Montessori Munari Mobile Template
Print the shapes at full scale, mount them on lightweight card and follow the balancing method below.
Materials: Choose Light, Stable and Easy-to-Check Parts

Skip these additions: bells, beads, buttons, loose ribbon, battery lights, long decorative cords and anything that could detach as a small part. The mobile is a visual material, not a grasping toy.
Step 1: Print, Mount and Cut the Shapes
Print the template at actual size. Glue the pieces to lightweight card before cutting. For each double-sided form, align the front and back carefully so the shape looks clean from both directions.
1
Print the pages at 100% scale and confirm the printer has not added a border that cuts the design.
2
Glue the printed sheet to thin card, smooth it flat and allow it to dry under a book.
3
Cut precisely around each outline. Uneven edges add tiny weight differences that become noticeable on the smallest dowel.
4
Pierce a small hole at each marked hanging point. Keep it far enough from the edge that the thread cannot tear through.
Step 2: Build from the Bottom Up
Do not tie every part together and attempt to fix the final mobile. Balance one dowel at a time. Each completed lower section becomes one of the weights on the dowel above it.
The balancing rule
Tie the two hanging elements loosely to the ends of one dowel. Loop a temporary support thread around the dowel and slide that support point left or right until the dowel hangs level. Only then secure the knot. The support point will rarely sit exactly in the middle because the two hanging elements do not weigh the same.
Use removable tape while testing. Tape keeps a loose thread from sliding away while you check the level. Once the balance is correct, replace the temporary hold with a secure knot and inspect it closely.
Step 3: Set the Distances Between Levels
The forms need enough space to rotate without striking each other. Before trimming thread, hold the mobile in a gentle air current and watch the full turn of every piece.
Check 1: Rotation
Check 2: Level
Check 3: Connections
Step 4: Hang It for Awake Observation, Not Sleep
A Montessori visual mobile fits most naturally over a movement mat where the baby is awake and supervised. That keeps the sleep space clear and lets you observe whether the baby can see the mobile, whether the movement is calm and whether the hanging point remains secure.
The safety rule overrides the perfect height
The mobile must remain fully out of reach and be attached to a fixing designed for the ceiling or wall material. Never rely on a light adhesive hook above a baby. Check the fixing, top thread and knots before every use. Move or retire the mobile as soon as the baby begins pushing up, rolling beneath it or reaching toward any part.
The American Academy of Pediatrics advises that crib mobiles must be securely attached, unreachable and removed when a baby can get onto hands and knees or at five months, whichever comes first. A simpler home rule is to keep this DIY mobile out of the crib entirely and use it only in a supervised awake area.
How to Present the Mobile
There is almost nothing to perform. Place the alert, calm baby on their back beneath the mobile, remain nearby and allow natural air movement to turn the forms. Do not spin it quickly, shake it over the baby or repeatedly redirect their gaze.
1
Choose a calm awake window, often after changing and before the baby becomes hungry or overtired.
2
Place the baby beneath the mobile and wait. Looking away is a normal pause, not a cue to move the mobile closer.
3
End the observation when the baby becomes fussy, turns away repeatedly, falls asleep or begins trying to reach the mobile.
If the Mobile Does Not Hang Properly
When to Move to the Next Mobile
A printed age chart is less useful than the baby’s behaviour. The Munari has finished its job when the baby consistently looks elsewhere, becomes more interested in colour and depth, or begins reaching toward hanging objects.
Next step: A colour-based visual mobile such as the octahedron or Gobbi mobile may suit the next period of visual interest. Once the baby reaches deliberately, visual mobiles should give way to securely suspended grasping materials designed to be touched.
Questions Parents Ask Most Often
Can I use a glass sphere in a Munari mobile?+
Traditional examples may use glass, but a lightweight clear acrylic ornament is the more practical home DIY choice above a baby area. Whatever you use must be securely closed, free from loose caps and fully out of reach.
Can I hang the Munari mobile over the crib?+
A supervised awake movement area is the clearer setup for a DIY visual mobile. It keeps the crib focused on sleep and lets you inspect the mobile while it is in use. If any mobile is attached near a crib, follow current safe-sleep guidance, keep it unreachable and remove it before the baby can push up or at five months, whichever comes first.
Should I make the shapes move with a motor?+
No motor is needed. Natural air movement creates slower, less predictable rotation. A motor adds weight, sound and another failure point, and it can keep the mobile moving after the baby has disengaged.
How long should a baby look at the mobile?+
There is no required session length. Offer it during calm awake time and follow the baby’s gaze. Looking away, becoming fussy or falling asleep means the observation is over.
The Short Version
Print the shapes at full scale, keep every component lightweight and build the mobile from the smallest dowel upward. Find the balance point of each level before attaching the next one.
Hang it securely above a supervised awake area, inspect it every time and retire it as soon as the baby can reach or loses interest. The clean construction is the point. It does not need decoration or developmental promises added to it.
Sources & References
- Fantz, R. L. (1963). Pattern vision in newborn infants. Science, 140(3564), 296-297. DOI: 10.1126/science.140.3564.296
- Skelton, A. E., Maule, J., & Franklin, A. (2022). Infant color perception: Insight into perceptual development. Child Development Perspectives, 16(2), 90-95. DOI: 10.1111/cdep.12447
- American Academy of Pediatrics. (2023). Suitable Sleeping Sites: Safe at Night and Naptime. Retrieved from HealthyChildren.org
- American Academy of Pediatrics. Make Baby’s Room Safe: Parent Checklist. Retrieved from HealthyChildren.org
- U.S. Consumer Product Safety Commission. Toy Safety Business Guidance. Retrieved from https://www.cpsc.gov
- Montessori, M. (1949). The Absorbent Mind. Theosophical Publishing House.